> ## Documentation Index
> Fetch the complete documentation index at: https://allhandsai-docs-observability-span-signals.mintlify.site/llms.txt
> Use this file to discover all available pages before exploring further.
# Analytics
> Deploy Laminar for trace analysis in OpenHands Enterprise.
This guide walks you through enabling Laminar in OpenHands Enterprise (OHE) so conversations automatically send traces for observability and analysis.
For SDK-level tracing concepts, OTEL environment variables, and non-Laminar backends, see [Observability & Tracing](/sdk/guides/observability).
## Who This Is For
This guide is for users who want to deploy Laminar alongside OpenHands Enterprise and inspect traces from Enterprise conversations.
## Why Laminar in OHE?
Laminar helps you understand what your OpenHands deployment is doing in production:
* Inspect prompts, tool calls, answers, and nested agent behavior in Laminar's [trace views](https://laminar.sh/docs/platform/viewing-traces).
* Use [session replay for browser agents](https://laminar.sh/docs/tracing/browser-agent-observability) when conversations drive browser automation.
* For Helm installs, define [signals](https://laminar.sh/docs/signals/introduction) to classify failures, measure outcomes, and monitor recurring patterns across many traces.
For more information on evaluating skills, see [Evaluating Agent Skills](https://www.openhands.dev/blog/evaluating-agent-skills).
## Prerequisites
Before you begin, complete the [Quick Start guide](/enterprise/quick-start).
## Enable Analytics
VM installs currently support trace collection, but do not support Laminar signals. The Admin Console configures the Laminar Project API Key only; the installer sets the remaining Laminar connection values automatically.
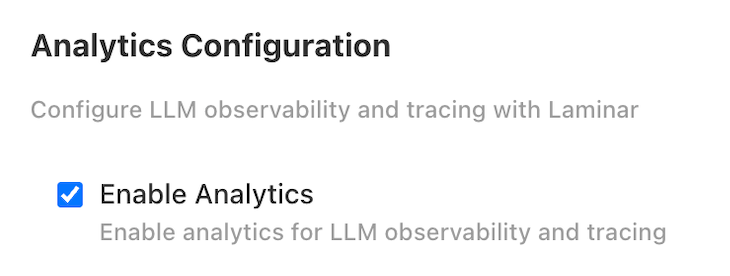
You should see an **Analytics Configuration** section on the application configuration page.
Check the **Enable Analytics** box to have the installer set up and configure Laminar for analytics.
 If you deployed OpenHands Enterprise into your own Kubernetes cluster using Helm, enable Laminar in your `values.yaml` override file.
```yaml theme={null}
laminar:
enabled: true
global:
# Set to "aws" or "gcp" to match your cluster.
cloudProvider: "aws"
frontend:
ingress:
enabled: true
hostname: "analytics.app."
tls:
enabled: true
secretName: "laminar-frontend-tls"
appServer:
# Use an app-server ingress on GCP or other L7 ingress setups.
ingress:
enabled: true
hostname: "laminar-api."
tls:
enabled: true
secretName: "laminar-app-server-tls"
# On AWS, use a Network Load Balancer instead of appServer.ingress
# if your runtimes send traces directly over TCP.
loadBalancer:
enabled: false
```
Keep `laminar.enabled: false` until your ingress, TLS, and storage class settings match your cluster.
## Deploy
OpenHands will begin deploying. You can expect the deployment status to transition from **Missing** to **Unavailable** to **Ready**. This typically takes 10-15 minutes.
If you deployed OpenHands Enterprise into your own Kubernetes cluster using Helm, enable Laminar in your `values.yaml` override file.
```yaml theme={null}
laminar:
enabled: true
global:
# Set to "aws" or "gcp" to match your cluster.
cloudProvider: "aws"
frontend:
ingress:
enabled: true
hostname: "analytics.app."
tls:
enabled: true
secretName: "laminar-frontend-tls"
appServer:
# Use an app-server ingress on GCP or other L7 ingress setups.
ingress:
enabled: true
hostname: "laminar-api."
tls:
enabled: true
secretName: "laminar-app-server-tls"
# On AWS, use a Network Load Balancer instead of appServer.ingress
# if your runtimes send traces directly over TCP.
loadBalancer:
enabled: false
```
Keep `laminar.enabled: false` until your ingress, TLS, and storage class settings match your cluster.
## Deploy
OpenHands will begin deploying. You can expect the deployment status to transition from **Missing** to **Unavailable** to **Ready**. This typically takes 10-15 minutes.
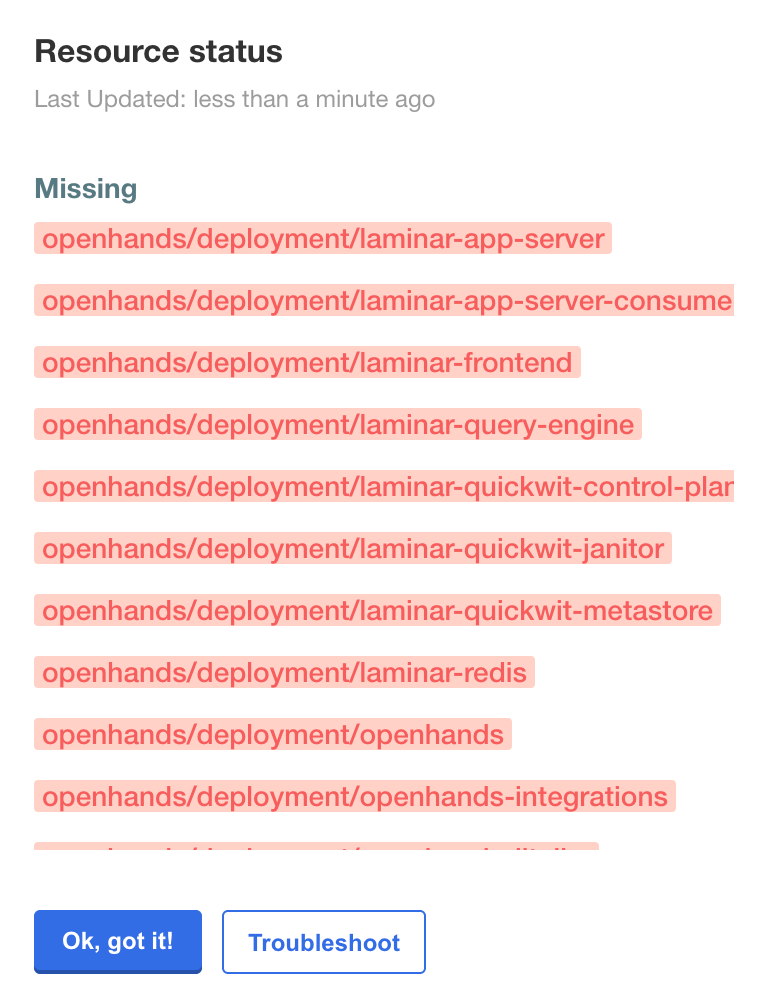
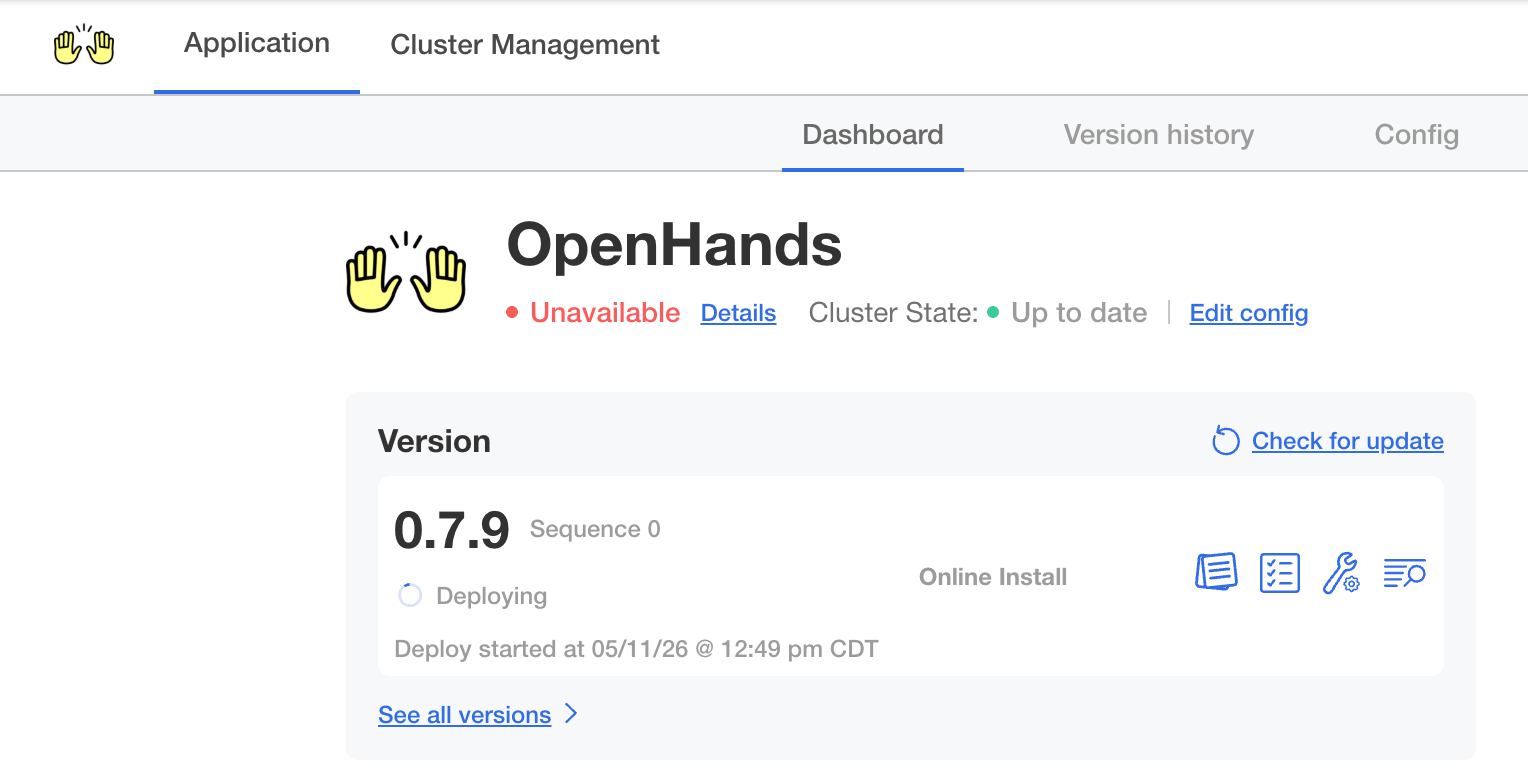 Click **Details** next to the deployment status to monitor individual resources. Resources shown in orange are still deploying, so wait until all resources are ready.
 Apply your updated `values.yaml` override file:
```bash theme={null}
helm upgrade openhands oci://ghcr.io/openhands/helm-charts/openhands \
--namespace openhands \
--values values.yaml
```
Wait for the Laminar workloads, ingress, and TLS resources to become ready.
## Access the Laminar UI
Once the deployment status shows **Ready**, navigate to the Laminar frontend URL:
* VM install: `https://analytics.app.`
* Kubernetes install: the hostname configured in `laminar.frontend.ingress.hostname`
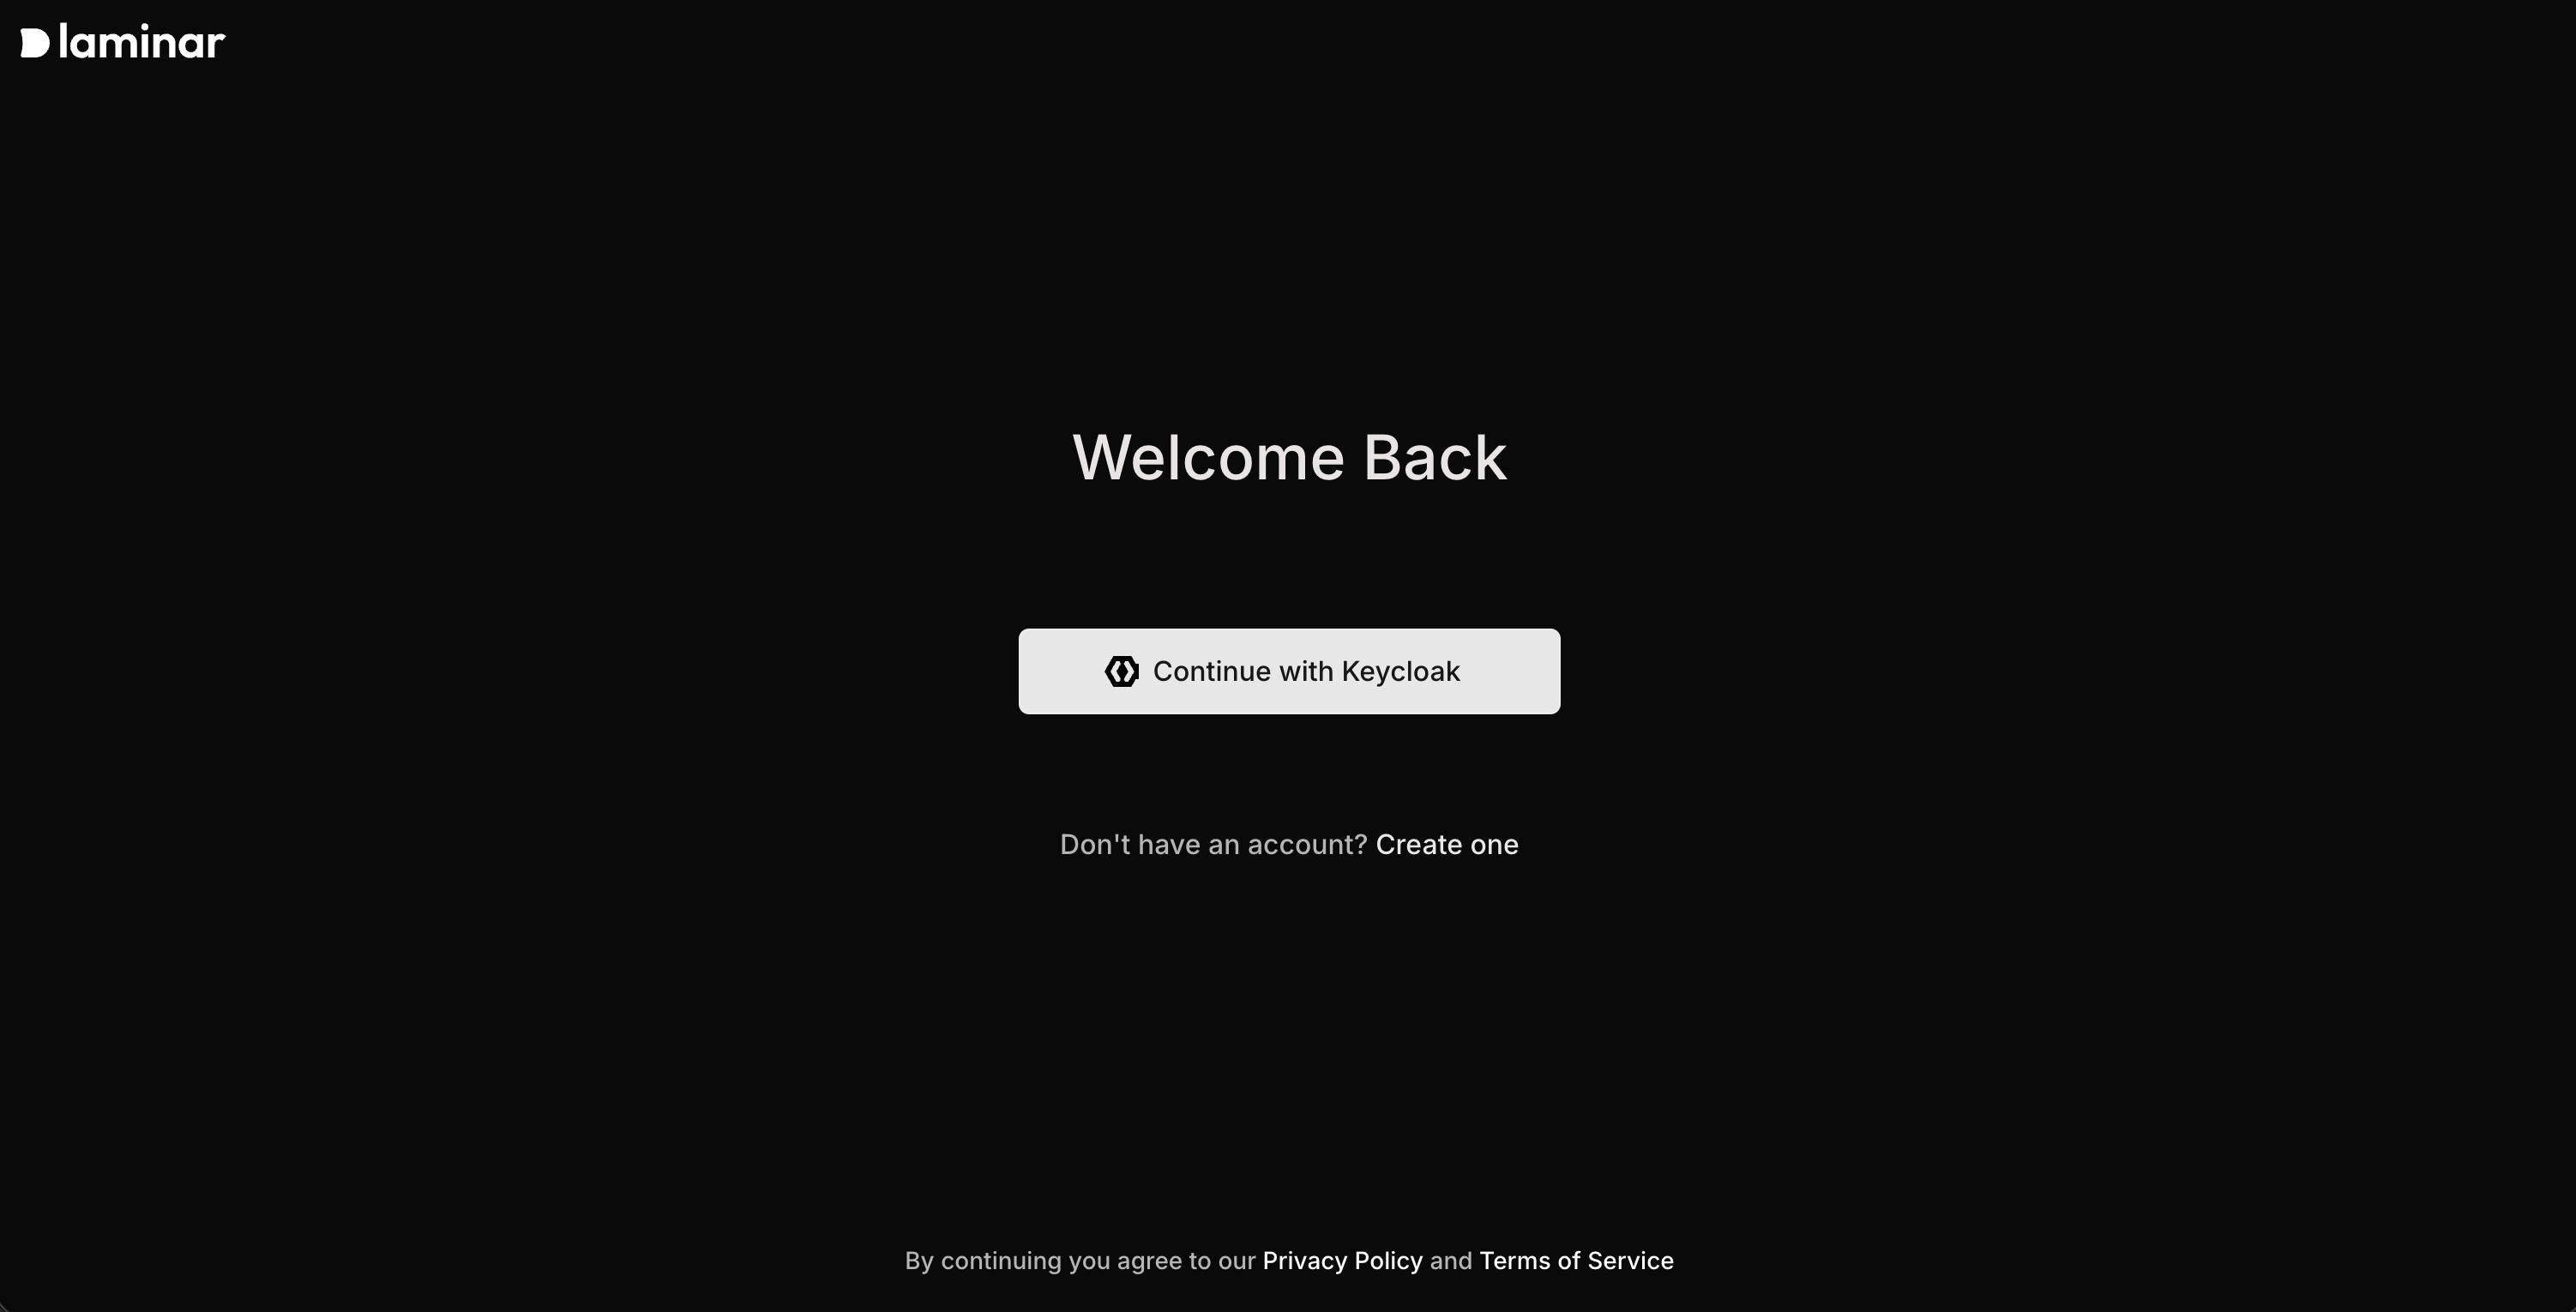
Click the **Continue with Keycloak** button:
Apply your updated `values.yaml` override file:
```bash theme={null}
helm upgrade openhands oci://ghcr.io/openhands/helm-charts/openhands \
--namespace openhands \
--values values.yaml
```
Wait for the Laminar workloads, ingress, and TLS resources to become ready.
## Access the Laminar UI
Once the deployment status shows **Ready**, navigate to the Laminar frontend URL:
* VM install: `https://analytics.app.`
* Kubernetes install: the hostname configured in `laminar.frontend.ingress.hostname`
Click the **Continue with Keycloak** button:
 If you want more background on Laminar Cloud versus self-hosting outside OHE, see Laminar's official [hosting options](https://laminar.sh/docs/hosting-options).
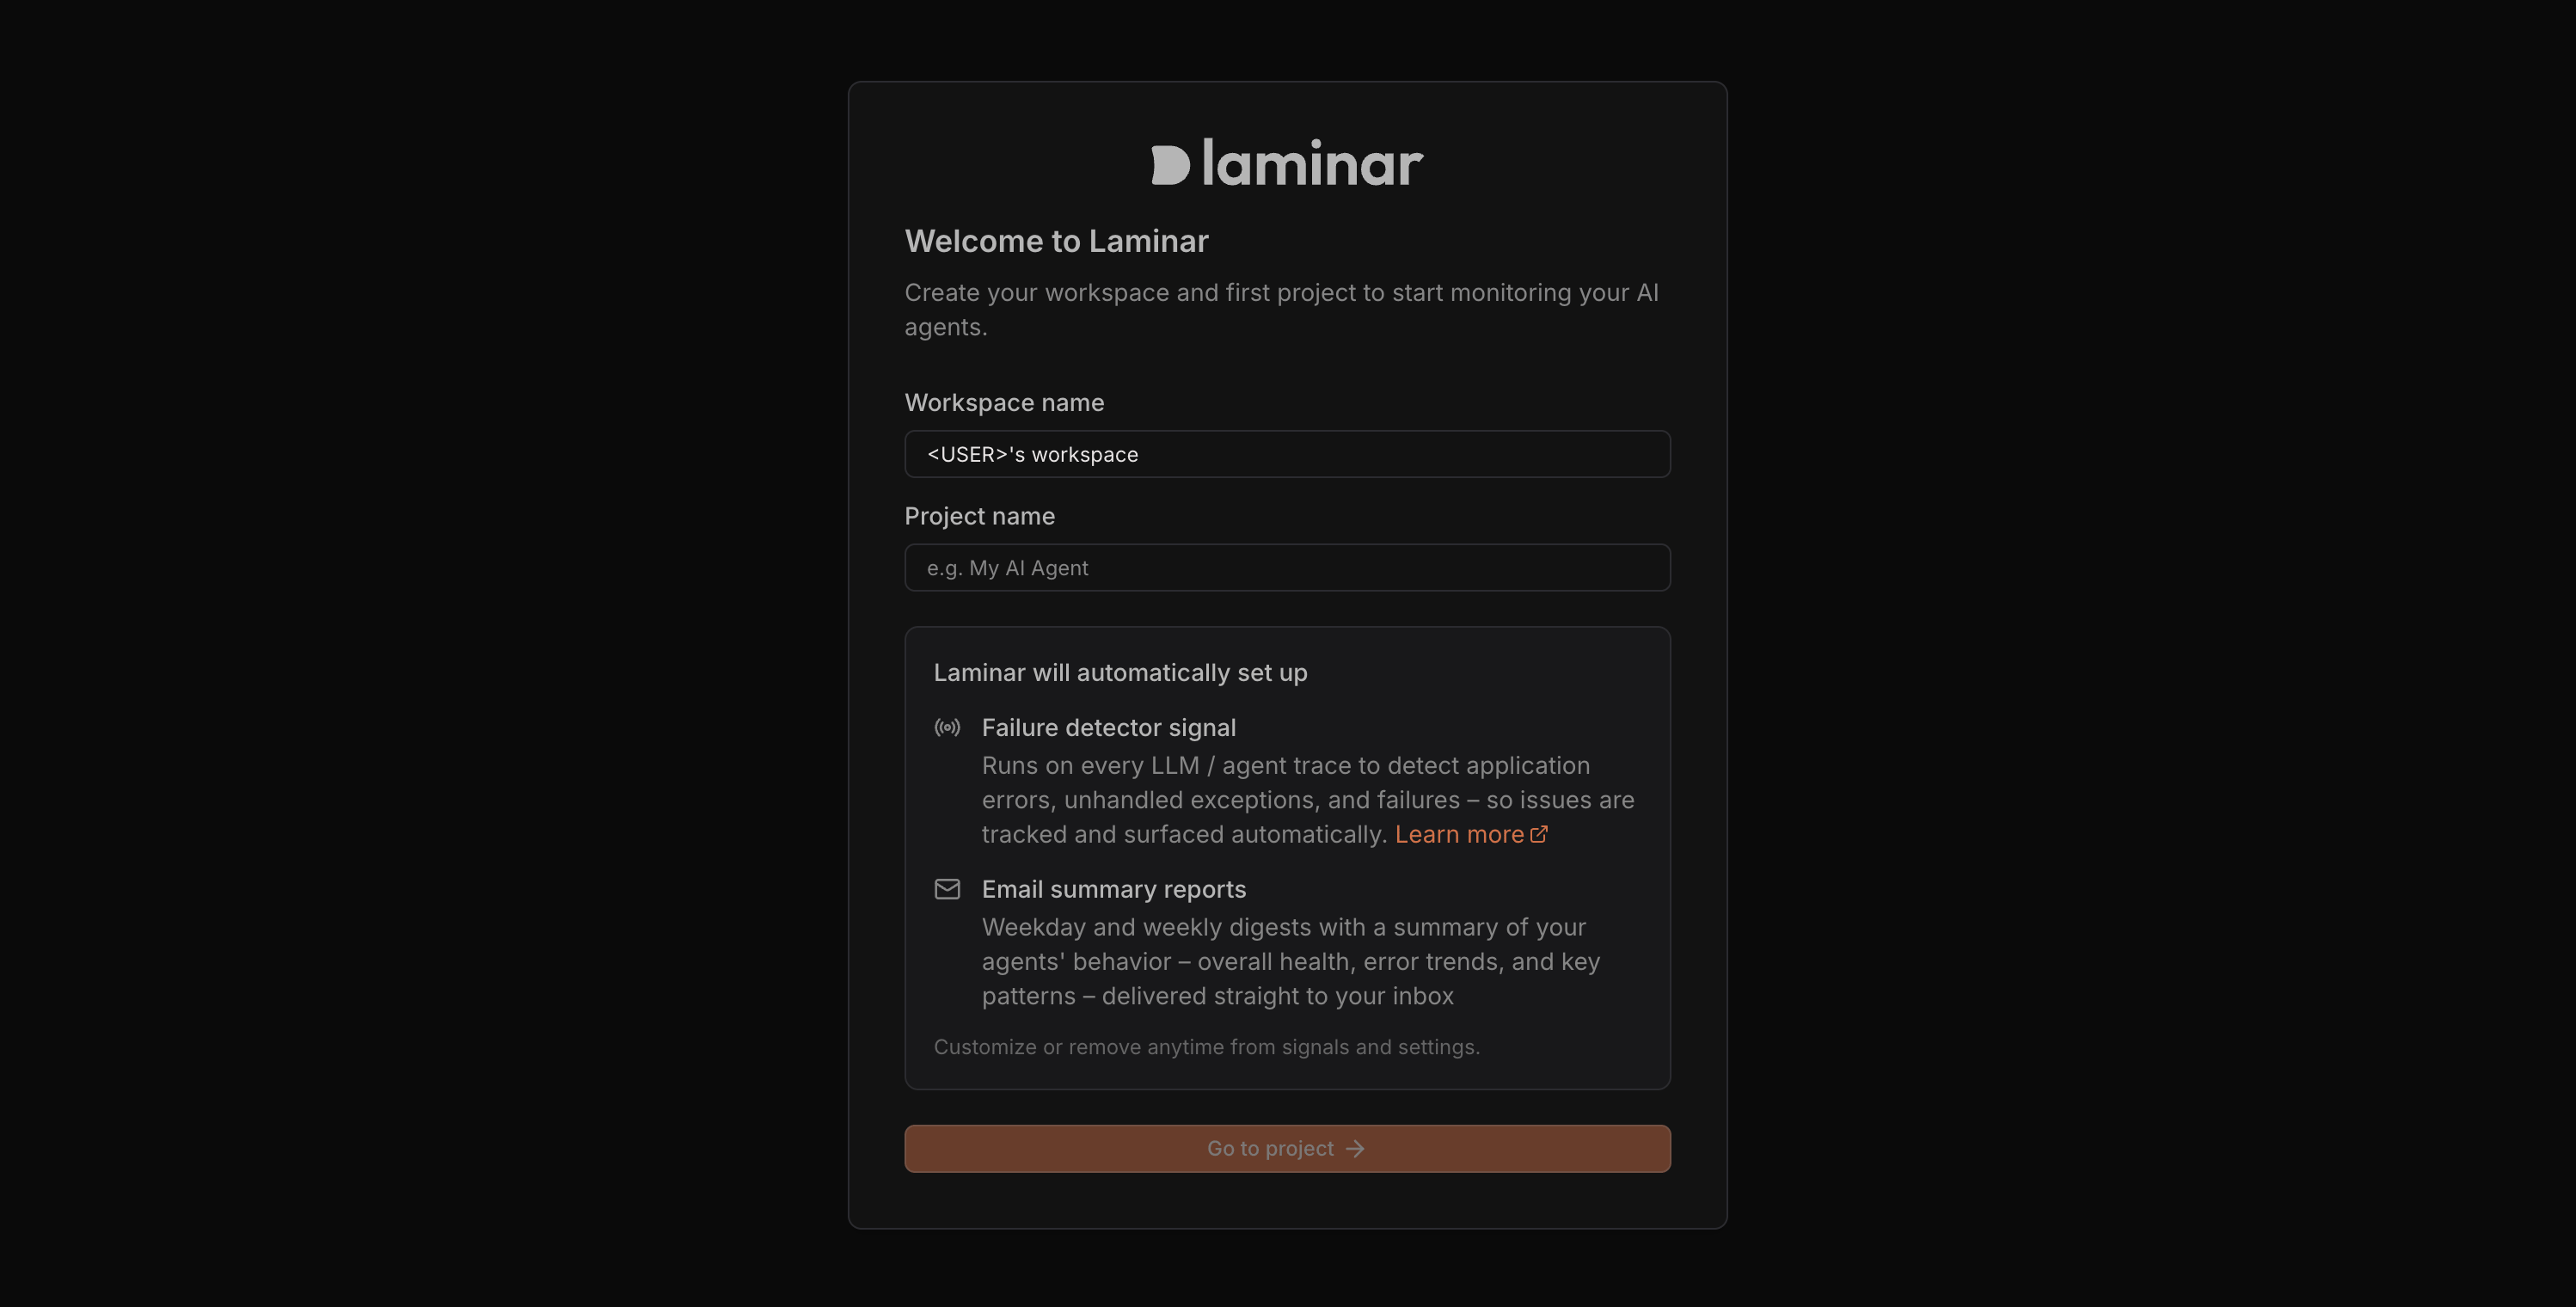
## Create a Laminar Project
Create a project in the Laminar UI:
If you want more background on Laminar Cloud versus self-hosting outside OHE, see Laminar's official [hosting options](https://laminar.sh/docs/hosting-options).
## Create a Laminar Project
Create a project in the Laminar UI:
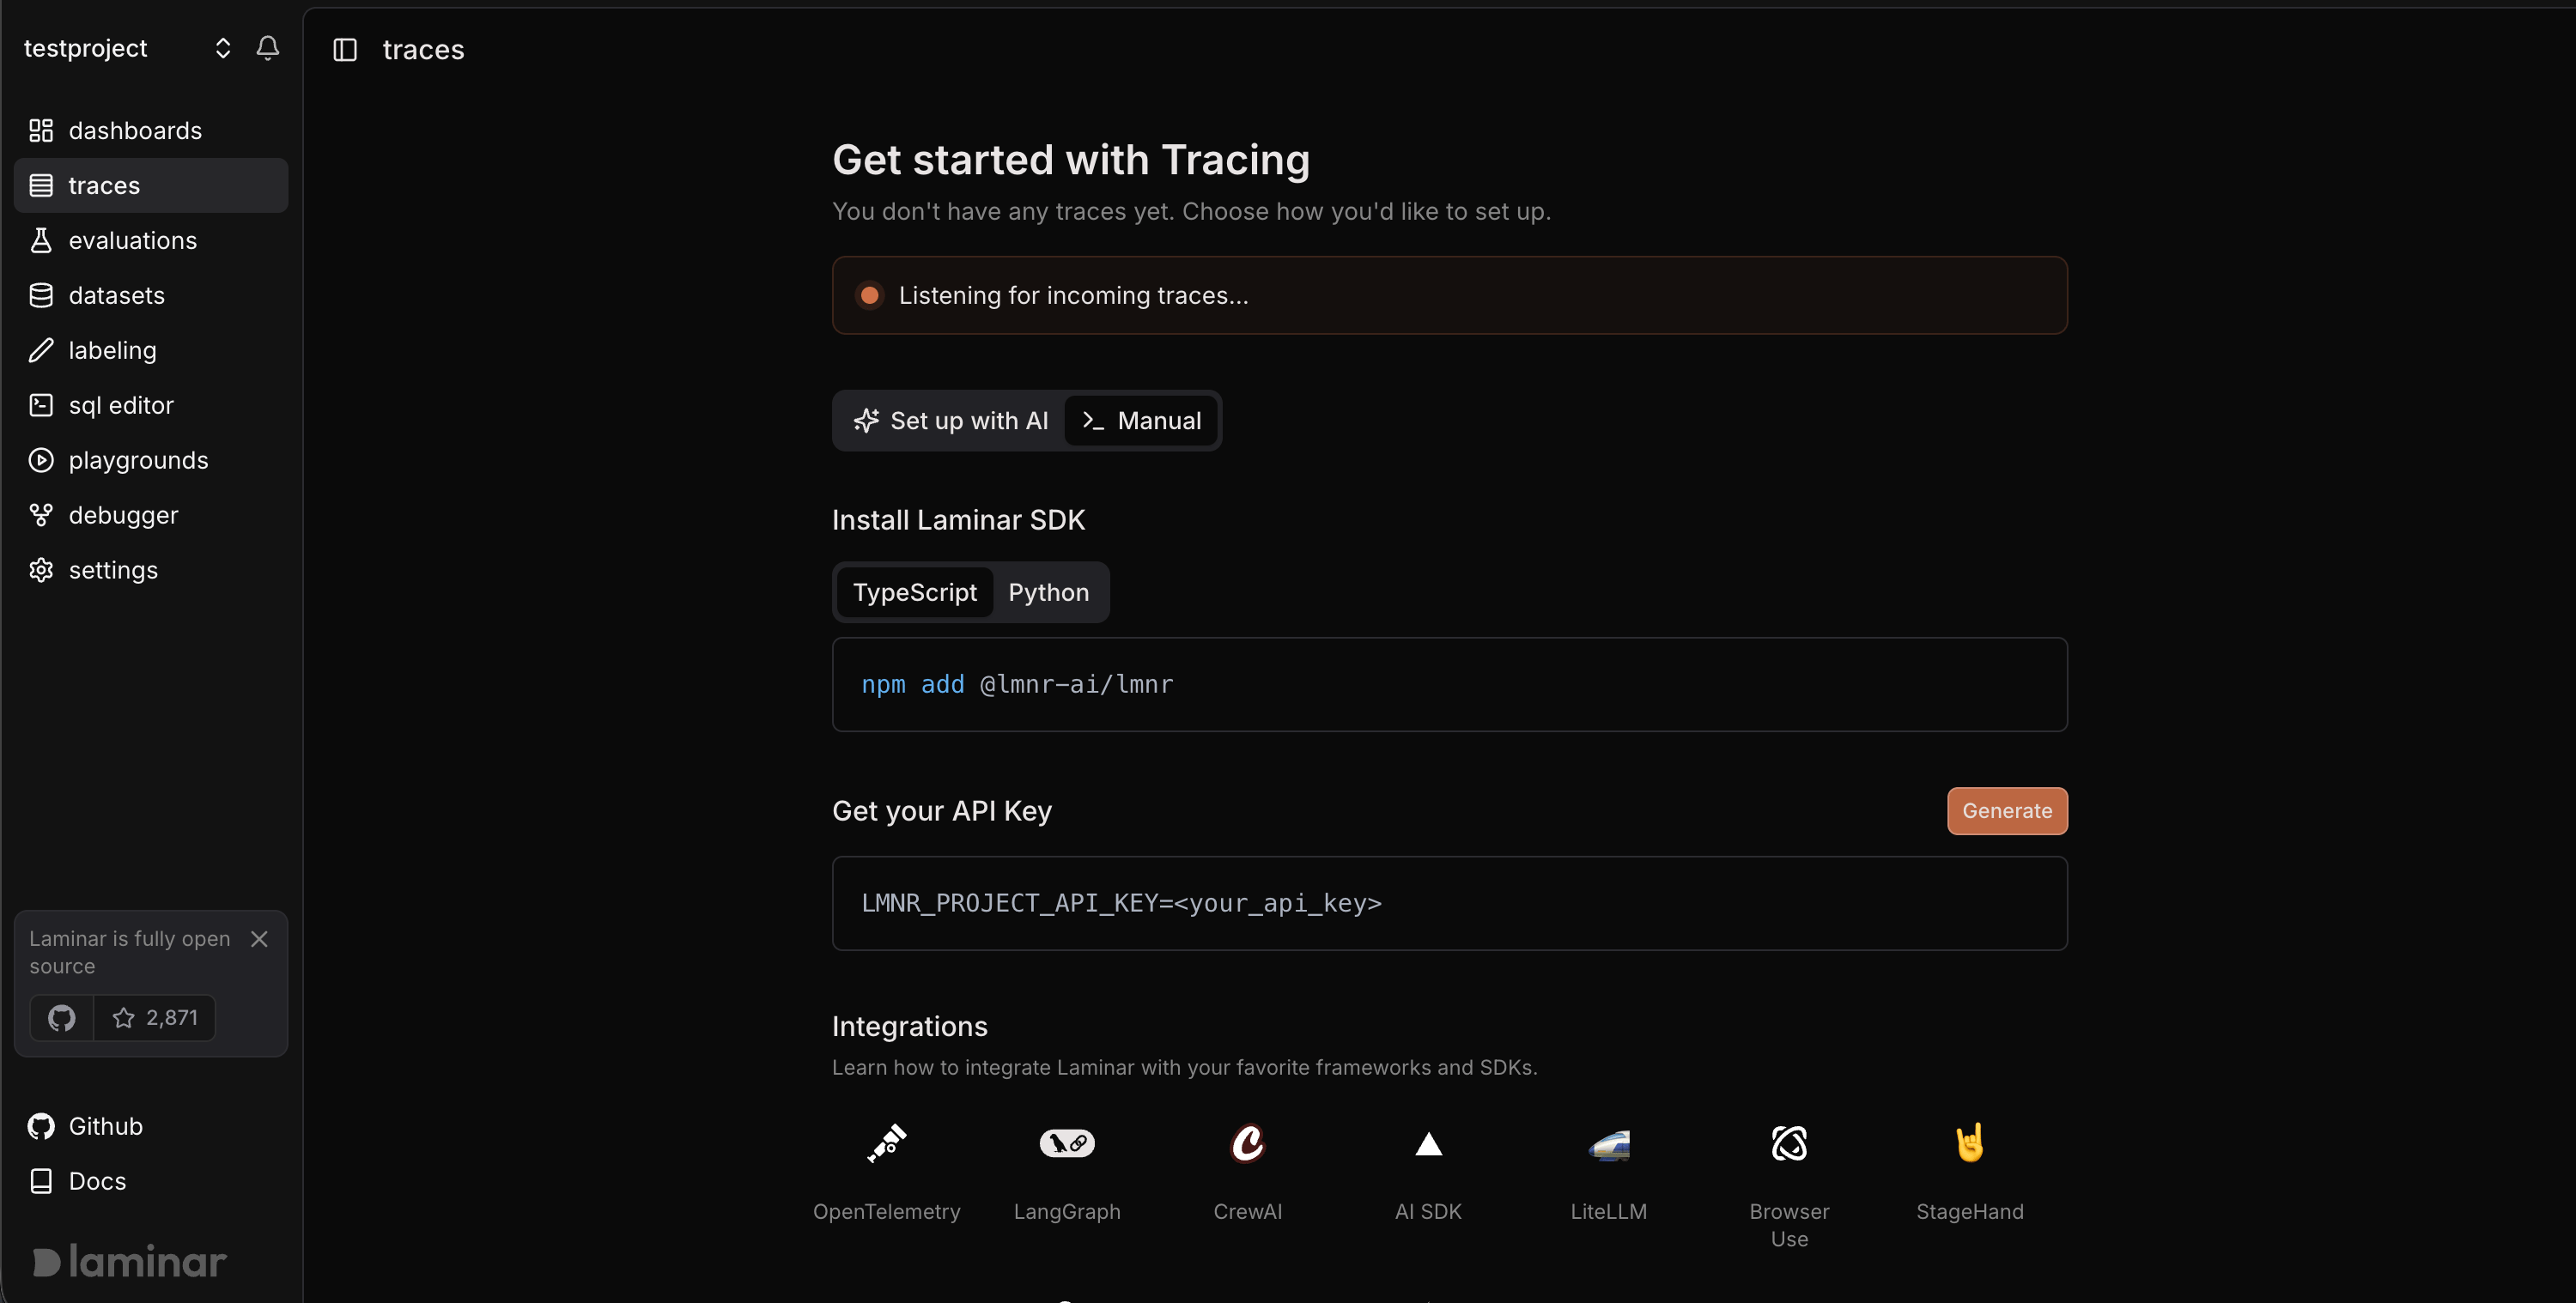
 Once a project has been created, Laminar is ready to listen for traces.
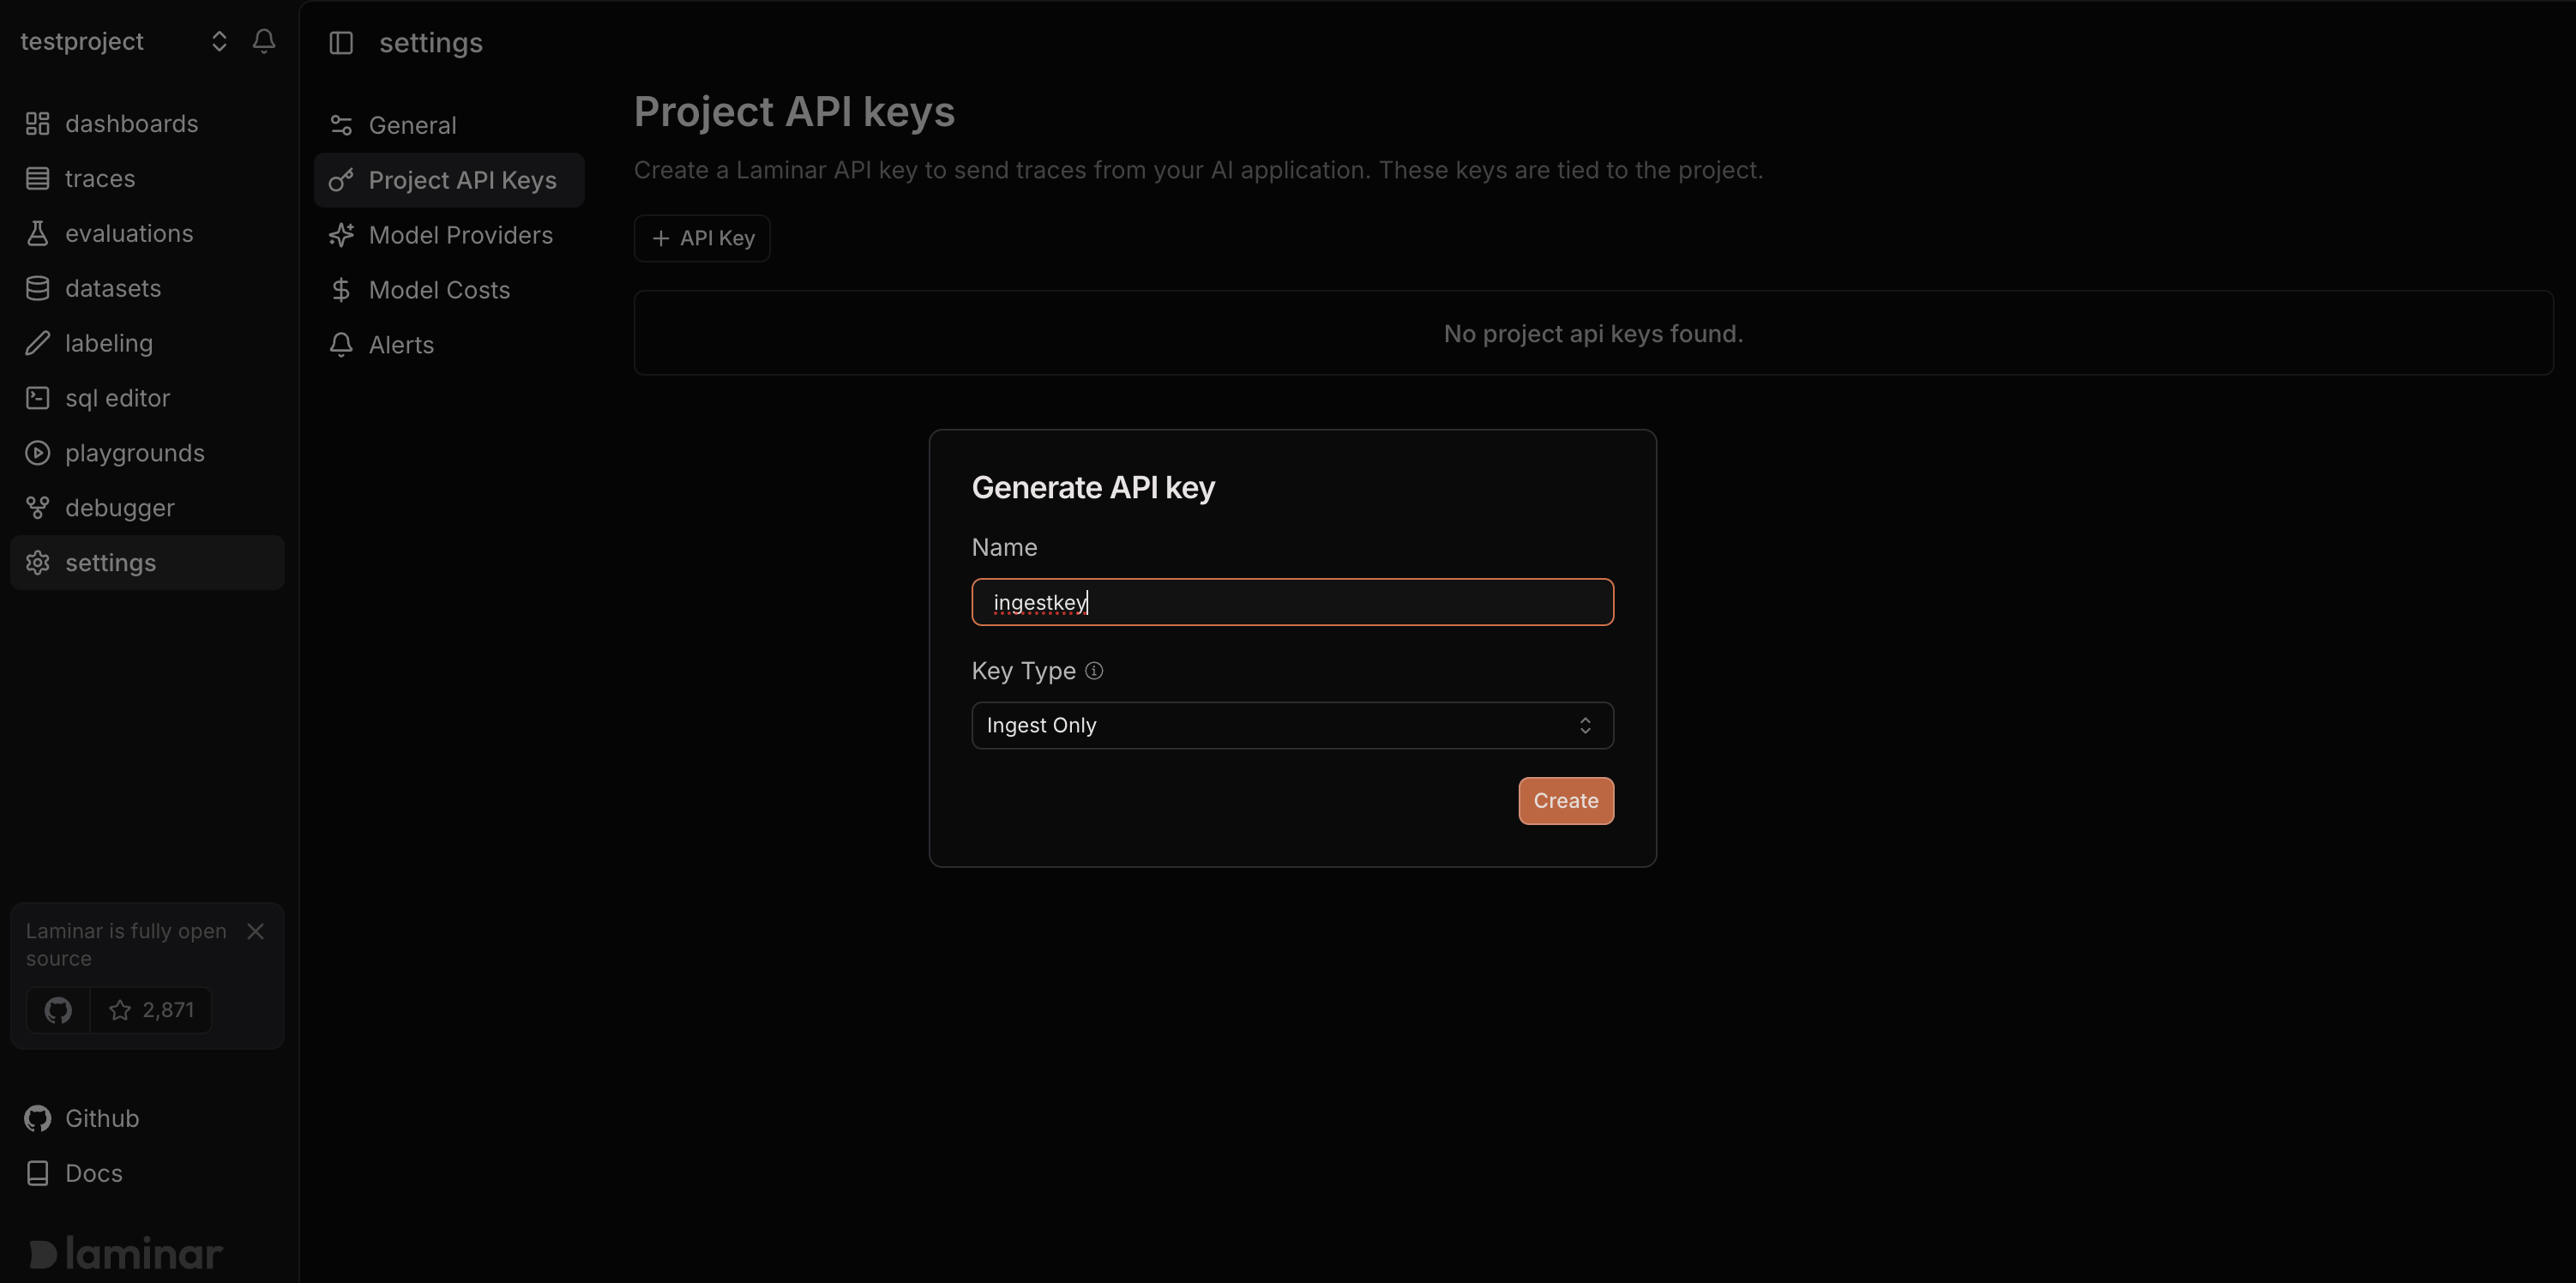
 ## Create an Ingest-Only API Key
Always use ingest-only API keys when deploying OHE.
Ingest-only keys are recommended because OHE only needs permission to write traces. They cannot be used to read trace data.
## Create an Ingest-Only API Key
Always use ingest-only API keys when deploying OHE.
Ingest-only keys are recommended because OHE only needs permission to write traces. They cannot be used to read trace data.
 ## Set the Laminar Project API Key
This is the same `LMNR_PROJECT_API_KEY` described in the [SDK observability guide](/sdk/guides/observability).
Set the ingest-only key as the **Laminar Project API Key** in the Admin Console configuration.
## Set the Laminar Project API Key
This is the same `LMNR_PROJECT_API_KEY` described in the [SDK observability guide](/sdk/guides/observability).
Set the ingest-only key as the **Laminar Project API Key** in the Admin Console configuration.
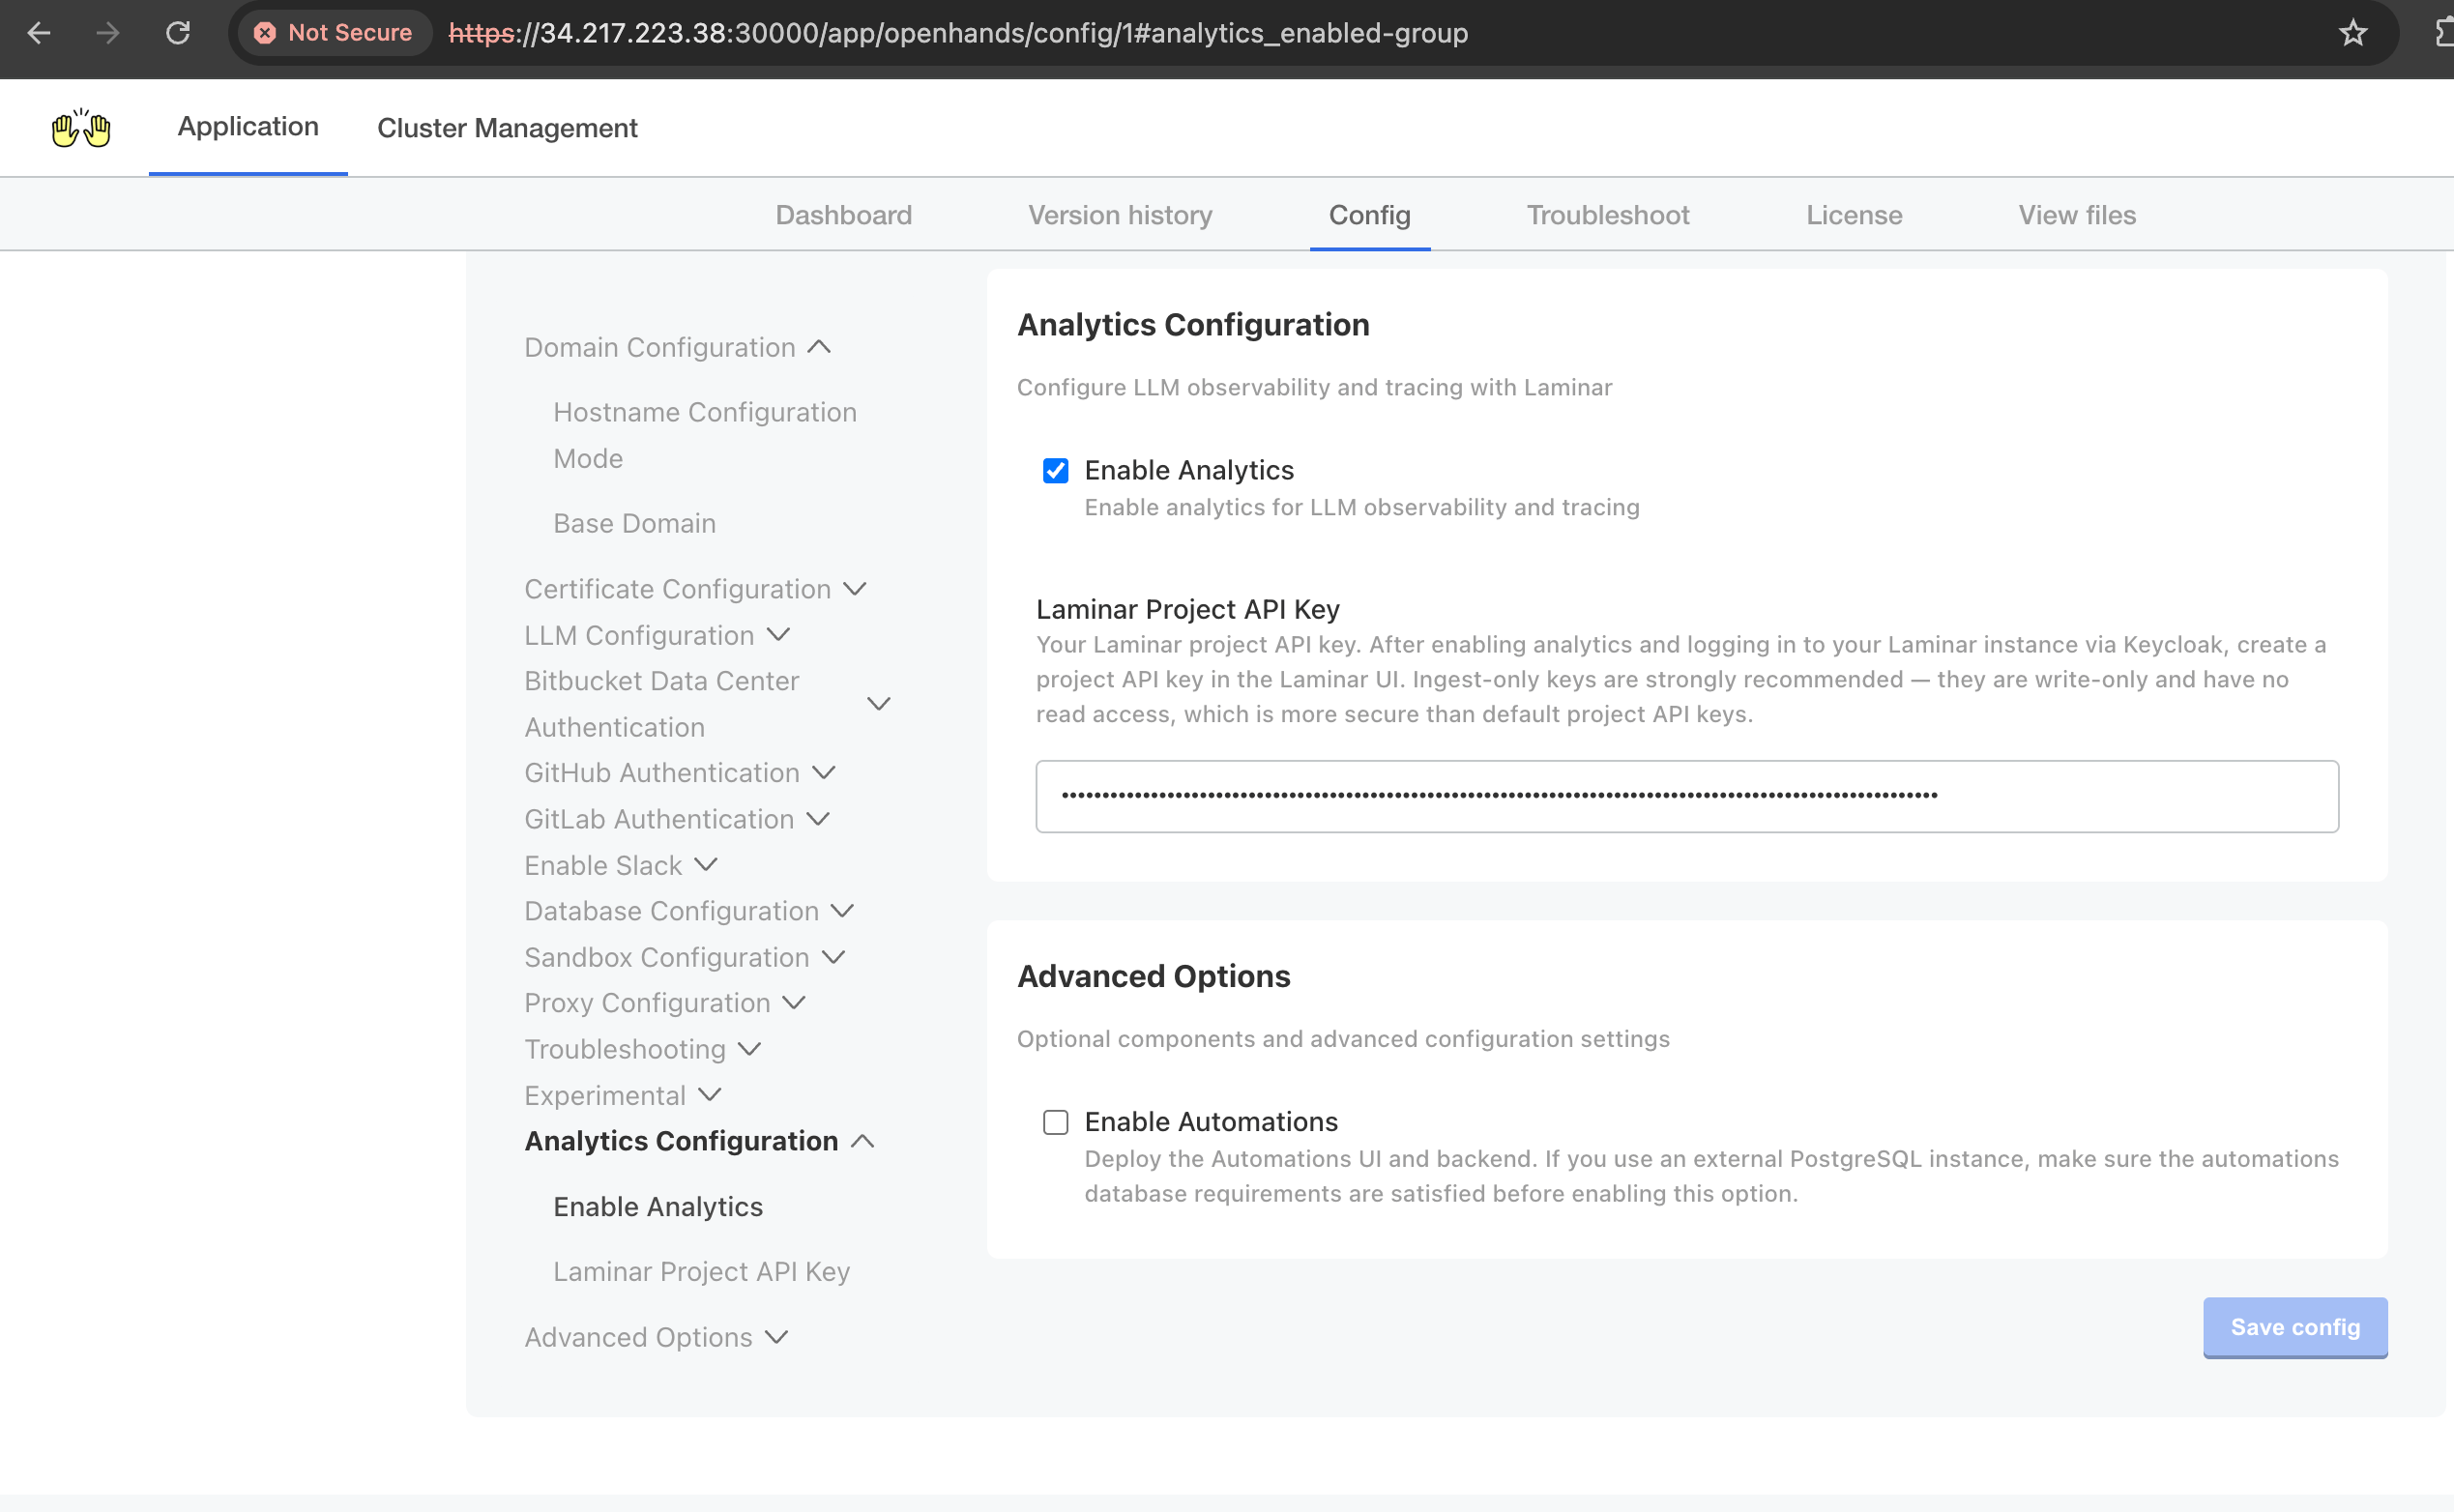 Click **Save config**.
Create a Kubernetes Secret for the ingest-only project key:
```bash theme={null}
kubectl create secret generic lmnr-project-api-key \
--namespace openhands \
--from-literal=LMNR_PROJECT_API_KEY=
```
Create a Secret for the Laminar app-server base URL:
```bash theme={null}
kubectl create secret generic lmnr-base-url \
--namespace openhands \
--from-literal=LMNR_BASE_URL=https://laminar-api.
```
Then reference those Secrets from your `values.yaml` override file:
```yaml theme={null}
laminar:
enabled: true
apiKeyFromSecret:
name: lmnr-project-api-key
key: LMNR_PROJECT_API_KEY
baseUrlFromSecret:
name: lmnr-base-url
key: LMNR_BASE_URL
forceHttp: true
```
If your self-hosted Laminar app server exposes a non-default HTTP port, set `laminar.httpPort`.
## Configure Runtime Environment Variables
VM installs configure analytics through the Admin Console. After analytics is enabled and the Laminar Project API Key is saved, the installer automatically configures:
```yaml theme={null}
LMNR_BASE_URL: "http://laminar-app-server-service"
LMNR_PROJECT_API_KEY: ""
LMNR_FORCE_HTTP: "true"
LMNR_HTTP_PORT: "8000"
```
The Admin Console does not currently expose `LLM_*` settings for Laminar AI features. VM installs currently send traces to Laminar, but do not support Laminar signals.
In OHE, environment variables whose names start with `LMNR_` or `LLM_` are forwarded to the SDK runtime. This lets you configure Laminar ingestion settings and the LLM settings used for Laminar-backed workflows.
For example, you can point the runtime at the managed Laminar endpoint and use an ingest-only project key:
```yaml theme={null}
LMNR_BASE_URL: "https://laminar-api."
# Ingest-only API key, not a read-capable secret:
LMNR_PROJECT_API_KEY: ""
LMNR_FORCE_HTTP: "true"
```
The chart sets `LMNR_PROJECT_API_KEY`, `LMNR_BASE_URL`, `LMNR_FORCE_HTTP`, and `LMNR_HTTP_PORT` from the `laminar` values above. If you need to override one of them directly, set it under the top-level `env` values in your `values.yaml`.
You can also control which LLM Laminar uses for its AI features — chat-with-trace, SQL-with-AI, and [signals](https://laminar.sh/docs/signals/introduction) — by forwarding the standard `LLM_*` variables. Add these values under the top-level `env` values:
```yaml theme={null}
env:
LLM_PROVIDER: "openai"
LLM_API_KEY: ""
LLM_BASE_URL: "https://llm-proxy."
LLM_MODEL_SMALL: "gpt-5.4-mini"
LLM_MODEL_MEDIUM: "gpt-5.4-mini"
LLM_MODEL_LARGE: "gpt-5.5"
```
`LLM_PROVIDER` accepts `gemini` (Laminar's default), `openai`, or `bedrock`, and `LLM_MODEL_SMALL` / `LLM_MODEL_MEDIUM` / `LLM_MODEL_LARGE` are optional per-tier model overrides. Set `LLM_PROVIDER` to `openai` whenever you point `LLM_BASE_URL` at an OpenAI-compatible gateway (for example LiteLLM, OpenRouter, or vLLM), not just the public OpenAI API. Set `LLM_API_KEY` for `gemini`, `openai`, and OpenAI-compatible gateways; use AWS credentials instead for `bedrock`.
For the full set of supported values, see Laminar's official [self-hosting configuration reference](https://laminar.sh/docs/self-hosting/configuration).
## Deploy Updated Configuration
Deploy the configuration change after setting the Laminar Project API Key.
Click **Deploy** in the Admin Console.
Click **Save config**.
Create a Kubernetes Secret for the ingest-only project key:
```bash theme={null}
kubectl create secret generic lmnr-project-api-key \
--namespace openhands \
--from-literal=LMNR_PROJECT_API_KEY=
```
Create a Secret for the Laminar app-server base URL:
```bash theme={null}
kubectl create secret generic lmnr-base-url \
--namespace openhands \
--from-literal=LMNR_BASE_URL=https://laminar-api.
```
Then reference those Secrets from your `values.yaml` override file:
```yaml theme={null}
laminar:
enabled: true
apiKeyFromSecret:
name: lmnr-project-api-key
key: LMNR_PROJECT_API_KEY
baseUrlFromSecret:
name: lmnr-base-url
key: LMNR_BASE_URL
forceHttp: true
```
If your self-hosted Laminar app server exposes a non-default HTTP port, set `laminar.httpPort`.
## Configure Runtime Environment Variables
VM installs configure analytics through the Admin Console. After analytics is enabled and the Laminar Project API Key is saved, the installer automatically configures:
```yaml theme={null}
LMNR_BASE_URL: "http://laminar-app-server-service"
LMNR_PROJECT_API_KEY: ""
LMNR_FORCE_HTTP: "true"
LMNR_HTTP_PORT: "8000"
```
The Admin Console does not currently expose `LLM_*` settings for Laminar AI features. VM installs currently send traces to Laminar, but do not support Laminar signals.
In OHE, environment variables whose names start with `LMNR_` or `LLM_` are forwarded to the SDK runtime. This lets you configure Laminar ingestion settings and the LLM settings used for Laminar-backed workflows.
For example, you can point the runtime at the managed Laminar endpoint and use an ingest-only project key:
```yaml theme={null}
LMNR_BASE_URL: "https://laminar-api."
# Ingest-only API key, not a read-capable secret:
LMNR_PROJECT_API_KEY: ""
LMNR_FORCE_HTTP: "true"
```
The chart sets `LMNR_PROJECT_API_KEY`, `LMNR_BASE_URL`, `LMNR_FORCE_HTTP`, and `LMNR_HTTP_PORT` from the `laminar` values above. If you need to override one of them directly, set it under the top-level `env` values in your `values.yaml`.
You can also control which LLM Laminar uses for its AI features — chat-with-trace, SQL-with-AI, and [signals](https://laminar.sh/docs/signals/introduction) — by forwarding the standard `LLM_*` variables. Add these values under the top-level `env` values:
```yaml theme={null}
env:
LLM_PROVIDER: "openai"
LLM_API_KEY: ""
LLM_BASE_URL: "https://llm-proxy."
LLM_MODEL_SMALL: "gpt-5.4-mini"
LLM_MODEL_MEDIUM: "gpt-5.4-mini"
LLM_MODEL_LARGE: "gpt-5.5"
```
`LLM_PROVIDER` accepts `gemini` (Laminar's default), `openai`, or `bedrock`, and `LLM_MODEL_SMALL` / `LLM_MODEL_MEDIUM` / `LLM_MODEL_LARGE` are optional per-tier model overrides. Set `LLM_PROVIDER` to `openai` whenever you point `LLM_BASE_URL` at an OpenAI-compatible gateway (for example LiteLLM, OpenRouter, or vLLM), not just the public OpenAI API. Set `LLM_API_KEY` for `gemini`, `openai`, and OpenAI-compatible gateways; use AWS credentials instead for `bedrock`.
For the full set of supported values, see Laminar's official [self-hosting configuration reference](https://laminar.sh/docs/self-hosting/configuration).
## Deploy Updated Configuration
Deploy the configuration change after setting the Laminar Project API Key.
Click **Deploy** in the Admin Console.
 For a VM install walkthrough, watch the recap:
Apply your updated `values.yaml` override file:
```bash theme={null}
helm upgrade openhands oci://ghcr.io/openhands/helm-charts/openhands \
--namespace openhands \
--values values.yaml
```
Wait for the deployment to complete.
## Start a Conversation
Navigate to the OpenHands UI at `https://app.`. Start a new conversation and try a prompt.
For a VM install walkthrough, watch the recap:
Apply your updated `values.yaml` override file:
```bash theme={null}
helm upgrade openhands oci://ghcr.io/openhands/helm-charts/openhands \
--namespace openhands \
--values values.yaml
```
Wait for the deployment to complete.
## Start a Conversation
Navigate to the OpenHands UI at `https://app.`. Start a new conversation and try a prompt.
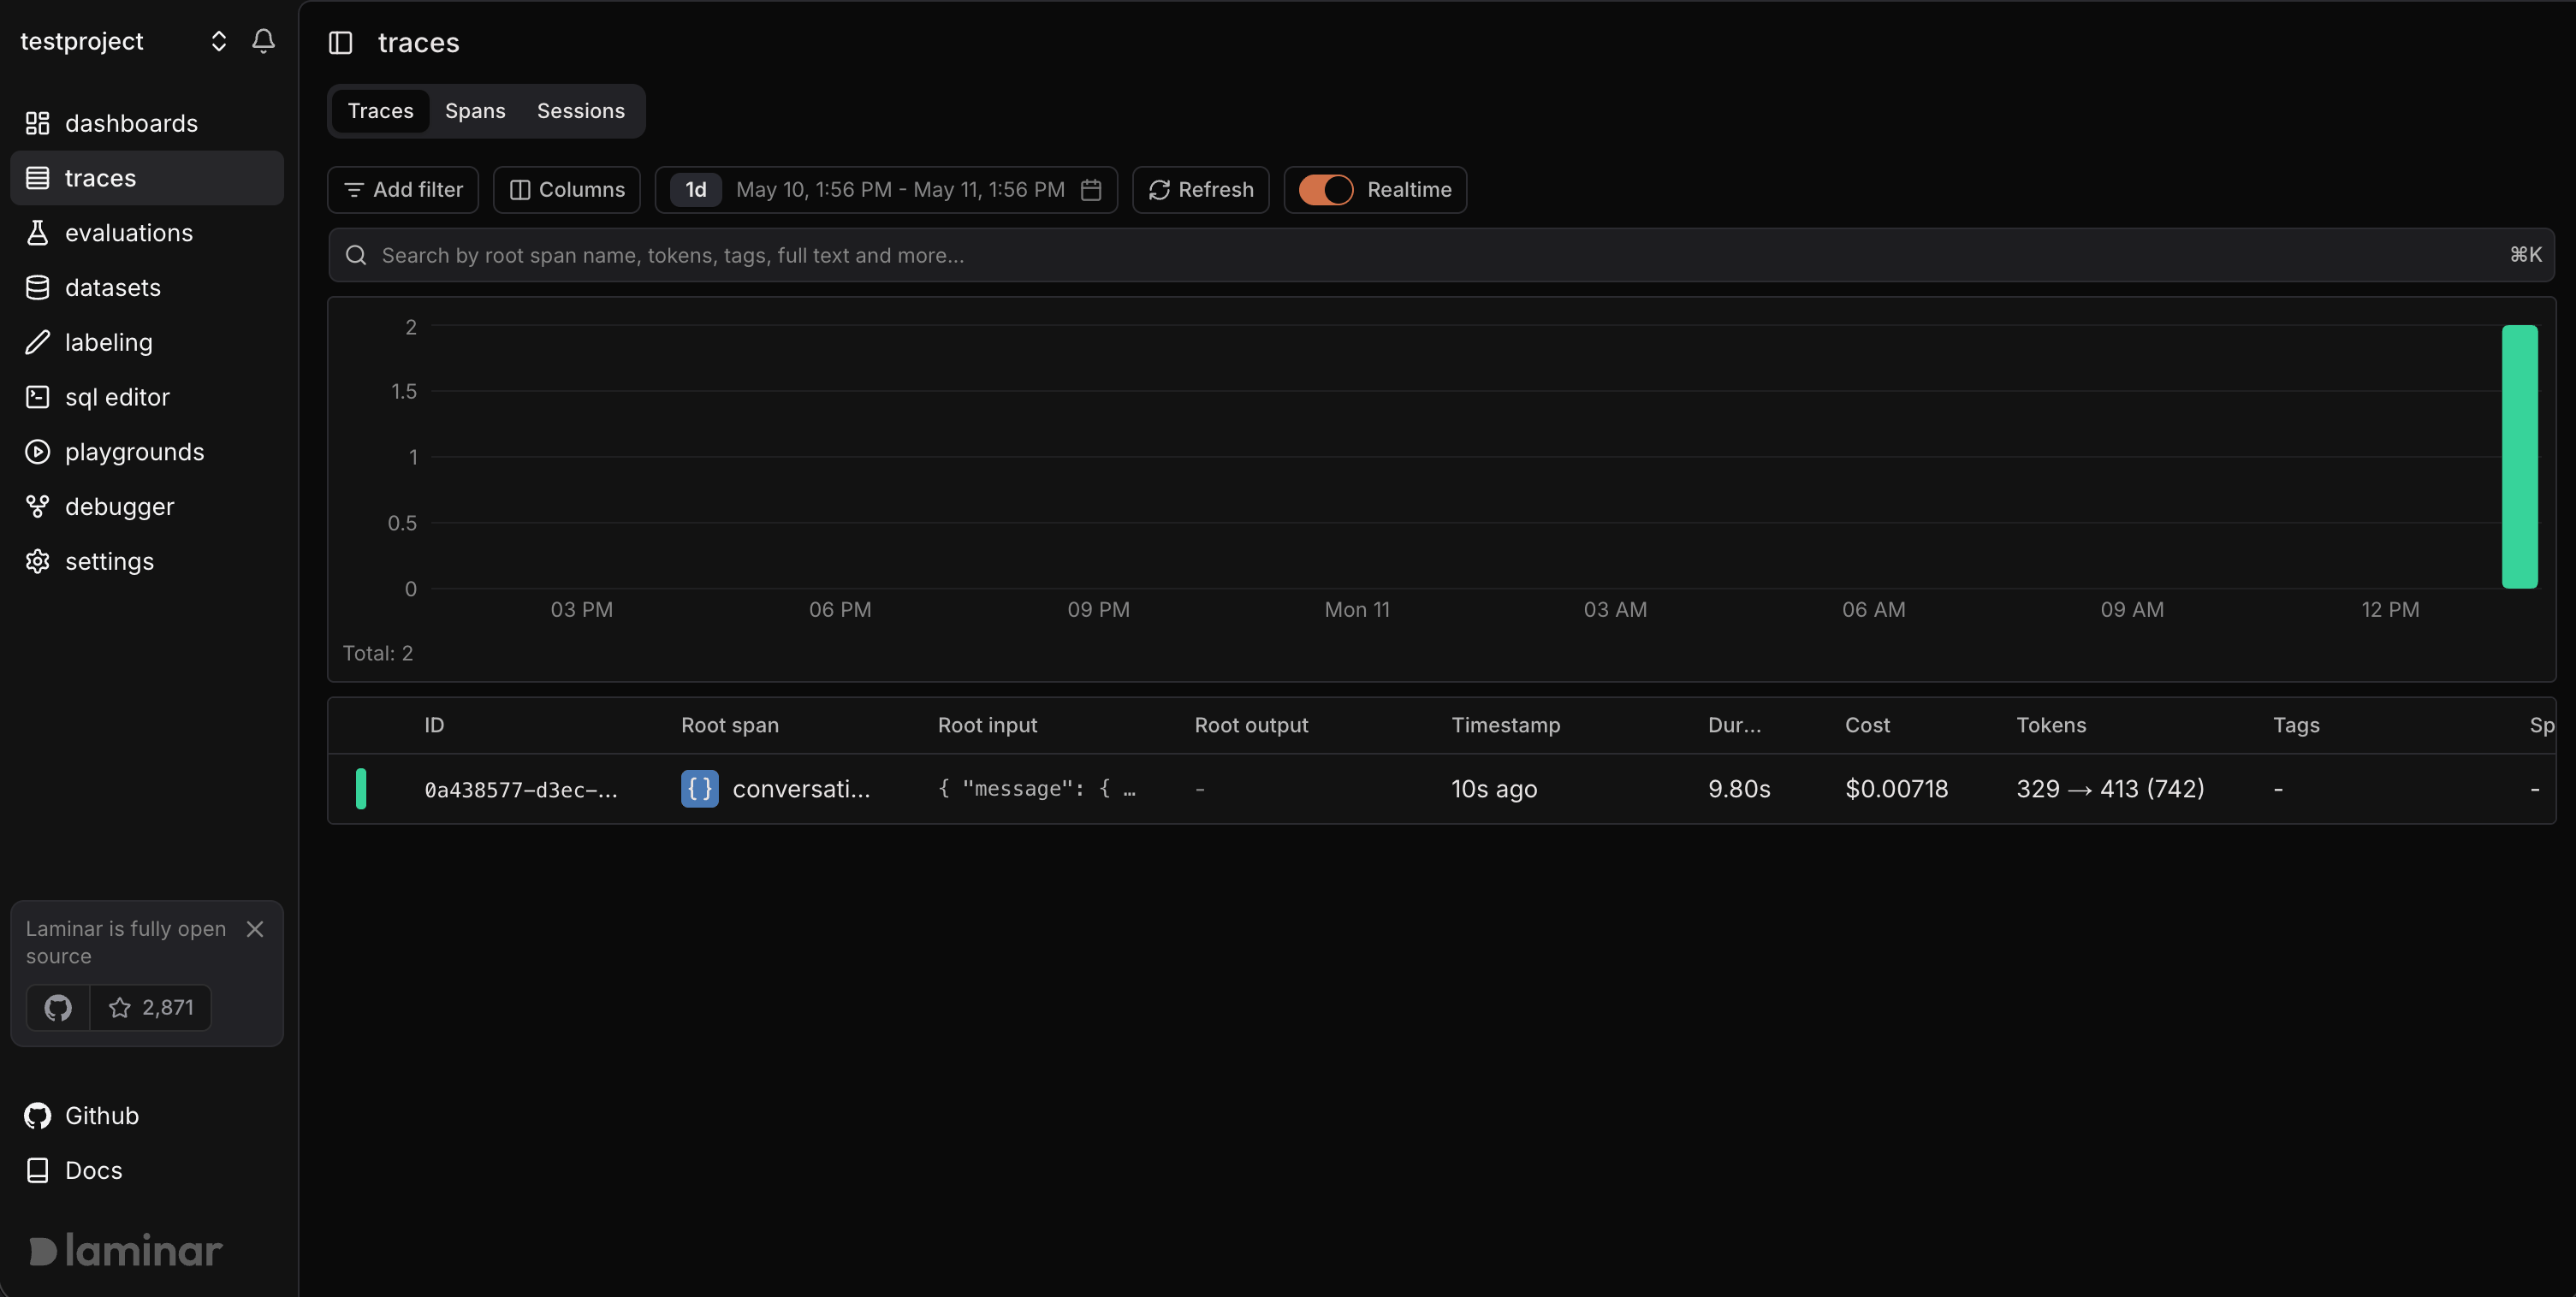
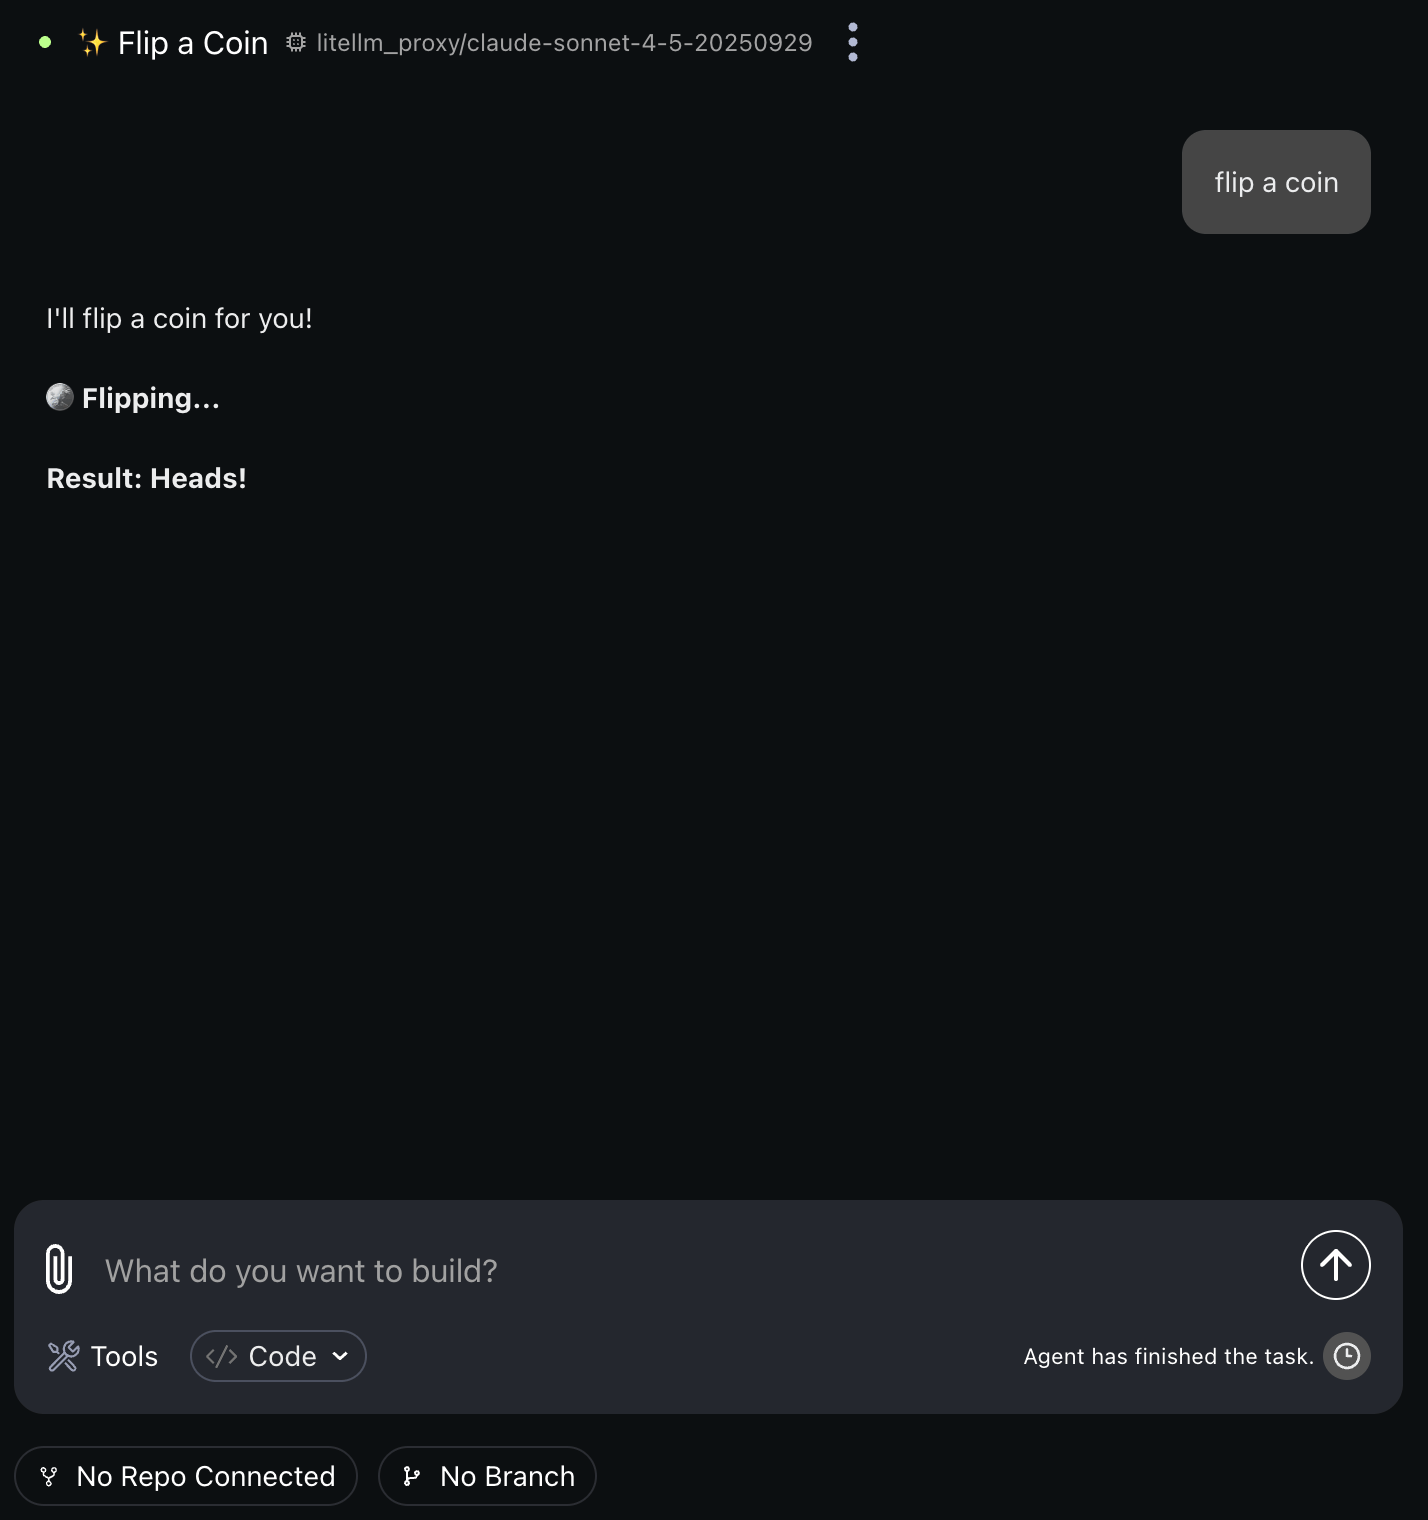 Your conversations will now automatically send traces to Laminar.
 ## What to Do Next in Laminar
Once traces are flowing, use Laminar's official docs to go deeper:
* [Viewing Traces](https://laminar.sh/docs/platform/viewing-traces) to inspect a single conversation in transcript, tree, or timeline views.
* For Helm installs, [Signals](https://laminar.sh/docs/signals/introduction) to extract structured outcomes or failure modes across many traces.
* [Session replay for browser agents](https://laminar.sh/docs/tracing/browser-agent-observability) to debug browser-based automations.
* [Observability for OpenHands Software Agent SDK](https://laminar.sh/docs/tracing/integrations/openhands-sdk) for the OpenHands-specific tracing model.
## Next Steps
Learn the full OpenHands tracing model, OTEL configuration options, and non-Laminar backends.
Get more reliable traces by improving the prompts you give your agents.
Reach out to the OpenHands team for deployment assistance or questions.
## What to Do Next in Laminar
Once traces are flowing, use Laminar's official docs to go deeper:
* [Viewing Traces](https://laminar.sh/docs/platform/viewing-traces) to inspect a single conversation in transcript, tree, or timeline views.
* For Helm installs, [Signals](https://laminar.sh/docs/signals/introduction) to extract structured outcomes or failure modes across many traces.
* [Session replay for browser agents](https://laminar.sh/docs/tracing/browser-agent-observability) to debug browser-based automations.
* [Observability for OpenHands Software Agent SDK](https://laminar.sh/docs/tracing/integrations/openhands-sdk) for the OpenHands-specific tracing model.
## Next Steps
Learn the full OpenHands tracing model, OTEL configuration options, and non-Laminar backends.
Get more reliable traces by improving the prompts you give your agents.
Reach out to the OpenHands team for deployment assistance or questions.